type1foodie
  • home
  • about
  • contact
  • search

kale chips

8/8/2013

0 Comments

 
ok, so it's been a while.  apologies!  sometimes life is like that.

it has been an incredibly busy few months for james and i:  in march we made an offer on an investment house across the street from our own (where my mom will eventually live), we stressed about said offer, we had an inspection, we requested repairs, repairs were accepted, we secured financing, we stressed about finding tenants, we found tenants, we closed in may, we spent two weeks getting the property ready for our tenants, tenants moved in, we planted our garden and sprayed yards for weeds, we celebrated our 9th wedding anniversary (next year's the big 1-0), we went to san francisco where i had a conference at the end of june, we visited my high school friend and her boyfriend (super dinner at zazie), we camped in the redwoods and visited sonoma wine country (discoveredsonoma valley portworks), we returned, we went boating on lake monroe with family and friends, we went to cedar point for my sister-in-law's 30th birthday, we sunburned (multiple times), ... work has been plentiful and we have been just enjoying the BITS of free time as we've had them. 

and now it's august!  

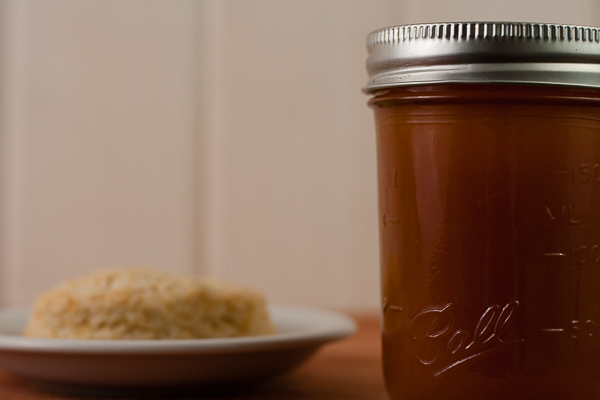
for sure we've been enjoying the summer produce lately, as i've made basil pesto and baba ganoush (both great on the tomatoes i've been buying from a local farmer for .60/lb).  another new recipe which i intend to share soon is a recipe for salted caramel sauce, which through a mistake and some subsequent innovation turned into the easiest salted caramel ice cream recipe EVER!

today i'm sharing this recipe for kale chips.  it's a very simple recipe, but without it i never remember at what temperature or for how long to cook the kale.  kale chips --  healthy, crisp... enjoy!

Picture
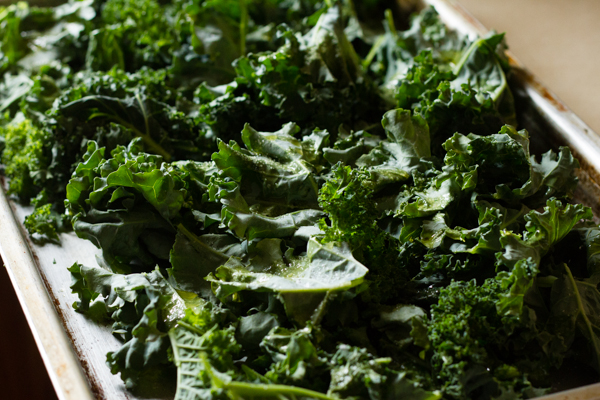
(pictured prior to oven time)

KALE CHIPS

Yield:  2 servings (or more if you don't love vegetables)
Nutrition:  187 calories, 10 carbs per serving

INGREDIENTS
1 head kale, washed and dried
2 tablespoons olive oil
sea salt, to taste

DIRECTIONS
Preheat the oven to 275.

Setting each kale leaf on a large cutting board, use a knife to remove the thick inside ribs.  Throw the ribs out and cut the remaining kale into pieces.  Lay on a baking sheet and use a utensil to gently toss the kale pieces with the olive oil and sea salt.  Bake until crisp, turning the leaves once ten minutes have passed.  Cook an additional ten minutes.   Serve once cool; these are best eaten immediately.!

SOURCE
Melissa d'Arabian, Ten Dollar Dinners
0 Comments

better-than-kraft baked macaroni and cheese

3/19/2013

0 Comments

 
i bring you baked macaroni and cheese.  james surprised me recently when we had this for the second sunday in a row (with corned beef and sauteed cabbage this time) by telling me that finally, i had made a better-than-kraft macaroni and cheese.  the man likes his processed food, though i try to limit it (according to my own definition and for my own reasons, of course).  i am reveling in my success.

feel free to play with the cheese in this recipe (a creamy boursin might be a great fourth cheese), but do not remove the brie.  more brie = even more awesome.  my favorite brie is a double creme brie found at sam's club, delice de france.  try it in this recipe or on its own as soon as you can!
Picture
BETTER-THAN-KRAFT BAKED MACARONI AND CHEESE
Yield: 6 servings
Nutrition: 387 calories, 40 carbs per serving


INGREDIENTS
4 tbsp unsalted butter, divided
2 tbsp flour
1 1/2 cups  whole milk
1 1/2 tsp kosher salt
1/4 tsp freshly ground black pepper
8 oz elbow macaroni
4 oz shredded cheddar, divided
4 oz shredded colby jack, divided
4 oz brie, rind removed and chopped into small bits, divided
1/2 tsp minced garlic
1/2 cup  panko breadcrumbs
1 tsp dried parsley

DIRECTIONS
Preheat oven to 400.  Melt 2 tbsp butter in a large saucepan over medium-high heat.  Add flour; cook, whisking constantly, for 1 minute.  Whisk in milk and 1 1/2 cups water.  Bring to a boil, reduce heat to a simmer, and cook, whisking often, until a very thin, glossy sauce forms, about 10 minutes.  Stir in 1 1/2 tsp salt and 1/4 teaspoon pepper.  Remove sauce from heat.

Toss pasta and 1 1/2 cups cheese in a 8 x 8 baking dish.  Pour sauce over (pasta should be submerged; do not stir) and cover with foil.  Bake until pasta is almost tender, about 20 minutes.

Meanwhile, melt remaining 1/4 cup butter in a large skillet over medium heat.  Add garlic, panko, and parsley and toss to combine.  Season with salt and pepper.

Remove foil from dish.  Stir.  Sprinkle with remaining 1/2 cup cheese, then panko mixture.  Bake until pasta is tender, edges are bubbling, and top is golden brown, about 10 minutes longer.  Let sit 10 minutes before serving.

SOURCE
Adapted from Bon Appetit, January 2013
0 Comments

peach butter

2/22/2013

0 Comments

 
peach butter is so delicious, but maybe you've never thought of it!  well, i hadn't anyway...  and i am so glad i did.  sometimes the simplest things are the best things, you know?  i love to eat this from the jar or on top of yogurt.  those who eat a higher number of carbs per meal than i do may like spreading it on biscuits as pictured.

i have included instructions for canning, though i prefer the flavor without the added sugar and lemon juice (and let's face it, i eat this pretty fast anyway).  nutritional information does not include the sugar and lemon juice.
Picture
PEACH BUTTER
Yield: 8 servings of 1/4 cup each
Nutrition: 19 calories, 5 carbs per serving


INGREDIENTS
1 lb bag of frozen peaches
1/2 cup water
1/2 cup sugar (if canning)
1 1/2 tsp lemon juice (if canning)

DIRECTIONS
Add frozen peaches to a saucepan.  Add water and cook on medium with a lid, watching carefully until the peaches have thawed.   Use an immersion blender to blend the peaches, or remove temporarily from saucepan to blend in a standalone blender.  With peaches in the saucepan, add optional sugar and lemon juice if desired (these will change the flavor but are necessary if you will can the peach butter for later use, see below for canning instructions).  Reduce the heat if necessary to keep the peaches  simmering for 30-40 minutes, stirring occasionally in the beginning and more often near the end to keep the peaches from scorching.  The peach butter is ready when it has reached the consistency that you desire.  Serve cold to room temperature.  If not canned, will keep up to 2 weeks in the refrigerator.

TO ACTUALLY CAN
Sterilize jars.  Add the peach butter to the jars, leaving 1/2 of an inch of space at the top.  Wipe the rims clean and cover the jars with their lids.  Submerge the jars in a large deep pot of boiling water for 10 minutes, either in a removable basket or in a canner.  After removing the jars with tongs, let cool completely on towels.   Test the success of your canning by pressing on the lid -- if there is no movement, your jar is sealed.  If canned properly, will keep indefinitely at room temperature.

SOURCE
Original
0 Comments

homemade yogurt

2/15/2013

2 Comments

 
do you have a digital thermometer?  then you can make homemade yogurt!  i have the best luck with this recipe in cooler temperatures (october through april), so now is the best time to try.  sweeter than store-bought yogurt, you may even like this plain!  serve with a spoonful of fruit butter, quality jam, or a few spoonfuls of granola.  


this weekend i will be celebrating my birthday by attending my first-ever food swap in indianapolis.  i've made peach butter to swap (recipe next week), and i'm excited to see what the event will be like.  though i may be bringing home several high-carb items to share with give to james, i hope to make some new finds!  and james promises to make my favorite coconut cream tart for my birthday dessert...
Picture
HOMEMADE YOGURT
Yield:  8 cups
Nutrition: 130 calories, 12 carbs per cup


INGREDIENTS
8 cups 2% milk
2 tsp plain yogurt (does not have to be exact)

DIRECTIONS
Heat the milk on medium-low until the temperature reaches 180 F.  Remove from heat to begin cooling.  When temperature is between 120-110 F (but not below or above), stir in the plain yogurt.  

Set your oven heat to warm, or the lowest temperature.  

Move the milk mixture to a glass or porcelain container with a lid, and fully wrap the container in a towel.  Turn the oven off, and place the wrapped container in the oven; close the door.  Let incubate for 8-12 hours; refrigerate.

Note: If you would like thicker yogurt, strain the yogurt by placing a cheesecloth or paper towel in the bottom of a strainer set over a bowl.  Leave in the fridge to strain and discard the liquid whey or use it for another purpose.

SOURCE
Original

2 Comments

simple brussels sprouts

2/1/2013

0 Comments

 
have you ever even had brussels sprouts?  real ones?  FRESH ones?  with BACON?  well, buckle up, because brussels sprouts are heavenly.  and simple.  

ps: don't mess with canned or frozen.  please.
Picture
SIMPLE BRUSSELS SPROUTS
Yield: 4 servings of 1 cup each
Nutrition: 114 calories, 14 carbs per serving

INGREDIENTS
5 cups brussels sprouts, raw with stems removed
12 slices center cut bacon, cut into matchsticks
extra virgin olive oil

DIRECTIONS
Bring a pot of water, fitted with a steamer, to boil.   Begin cooking bacon in a skillet, keeping an eye on it and stirring to prevent it from overcooking (remove when done cooking).  Meanwhile, wash the brussels sprouts in a bowl under room temperature water, peeling off the outer layer of each sprout if necessary.  Cut each brussels sprout in half to promote even cooking.  Place the brussels sprouts in the steamer and cover.   Steam for five minutes, removing from heat before the brussels sprouts have cooked through.   Warm olive oil on medium-low in a large skillet.  Add the brussels sprouts, placing a lid on top.  Wait.  Stir.  Add more olive oil.  Stir.  Checking frequently so not to overcook, cook until crisp and tender, adding the cooked bacon at the very end to warm.   Welcome to brussels sprouts heaven.

SOURCE
Original
0 Comments

eight hour croissants

1/25/2013

0 Comments

 
i wasn't planning to share this recipe for croissants.  it took talia and i eight hours to complete.  

but then we admired the croissants, savored the croissants, loved the croissants.  

and now we find ourselves wanting more croissants.

tasted by my friend cecile who comes from the south of france (marseille to be exact), these croissants have received a french stamp of approval.  1,000 times better than the local bakery, she says.  

i agree.
 
and i can't wait to spend eight hours making them again.
Picture
EIGHT HOUR CROISSANTS
Yield: 12 croissants
Nutrition: 371 calories, 31 carbs per croissant

INGREDIENTS
For the dough:
3 cups all purpose flour, additional for the work surface
1 tbsp instant yeast
1/4 cup sugar
1 1/4 tsp table salt
1 1/4 cups whole milk
2 tbsp unsalted butter
For the butter square:
3 sticks frozen unsalted butter, grated 
2 tbsp all purpose flour
For the egg wash:
1 egg, slightly beaten

DIRECTIONS
DAY ONE (ALLOW 8-9 HOURS IF BAKING IN ONE DAY)
Combine 2 3/4 cups of the flour with the yeast, sugar, and salt in a stand mixer bowl.  Stir to mix.  Place the bowl onto the stand mixer.  Attach the dough hook to the stand mixer and turn on low.  Add the milk and mix until a ball of dough forms (5 minutes).  Cut the 2 tbsp of butter in half and add to the dough; knead until the butter is fully incorporated.  Once the dough forms a ball and begins to clear the sides of the bowl (5-6 more minutes), turn off the stand mixer (if the dough is sticking to the sides of the bowl, add up to the extra 1/4 cup flour).   Remove the dough from the bowl and wrap in plastic wrap; refrigerate for one hour.

Place the grated butter in a bowl.  Mix with 2 tbsp flour.  Place in plastic wrap and shape into a 7 inch square.  Refrigerate 30 minutes.

DAY TWO
Remove the dough from the refrigerator.  Roll the dough out into an 11 inch square.  Place the 7 inch butter square on top of the dough diagonally.  Fold the dough over the edges of the butter square and seal.  Starting in the middle, slowly spread out the dough (with butter square inside) until it has once again become an 11 inch square.  Fold the dough into thirds from left to right, and then into thirds from top to bottom.  Wrap in plastic wrap and refrigerate for two hours.

DAY THREE
Repeat steps from Day Two.

DAY FOUR
Roll the dough out into a 20 inch square.  Cut this square into two pieces.  Cut each piece into three rectangles.  Divide each rectangle to make six right triangles.  Stretch each triangle gently to form an isosceles triangle, shaped like a Christmas tree.  Cut a one inch slit in the base of each triangle.  Folding the two corners of the slit outward, roll each triangle up from the base leaving the last 1/4 inch of the tip unrolled.  Transfer to a baking sheet lined with parchment paper or a silicone mat.  

Cover loosely with plastic wrap and let rise at room temperature (45-60 minutes).  After 30 minutes, preheat the oven to 400.  At 45-60 minutes, use a pastry brush to lightly coat the top of the croissants with the slightly beaten egg.

Bake until golden brown, 18-22 minutes (don’t get scared – let them get pretty brown).  Be sure to rotate halfway through baking and once finished, cool on a wire rack for 15 minutes.  Resist the urge to devour, as they are continuing to bake during these 15 minutes.  Store at room temperature in an airtight container 0-48 hours.  Reheat in a warm oven for 5-10 minutes before serving.

SOURCE
Adapted from Annie’s Eats via Baking Illustrated, 2004


0 Comments

homemade chocolate peanut butter

1/22/2013

2 Comments

 
homemade chocolate peanut butter is the feature today.  after an EPIC sunday-running into-monday adventure watching julie and julia and baking croissants from annie's eats with my friend and colleague talia (we finished at 2am), i didn't have much energy for cooking yesterday afternoon.   

a nine-hour project will do that to you.

i therefore present you with an easy recipe that you may not have previously considered.  perfect on celery, toast, or by the spoonful, compare this homemade chocolate peanut butter to peanut butter & co peanut butters.  there are many ways to customize: different kinds of peanuts (honey roasted), different kinds of chocolate (dark, white, milk), honey, maple syrup, cinnamon, raisins...  

what are you waiting for?
Picture
HOMEMADE CHOCOLATE PEANUT BUTTER
Yield: 20 tbsp
Nutrition:  92 calories,  6 carbs per tbsp

INGREDIENTS
2 cups roasted peanuts
1/2 cup chocolate chips
salt and sugar to taste

DIRECTIONS
Place roasted peanuts and chocolate chips in food processor.  Blend until forms a ball (approximately one minute).  Keep processing until peanut butter is to the consistency desired; after several minutes it will thin out to be creamier and thinner than pictured.  Add salt and sugar to taste; refrigerate and stir before serving if the oil from the peanuts has separated.

SOURCE
Original

2 Comments
    New Post Notification
    (email from Bloglovin)

    RSS Feed


    Categories

    All
    Appetizers
    Desserts
    Drinks
    Main Dishes
    Other
    Salads
    Side Dishes
    Soups

Proudly powered by Weebly